
ListView
| Suggestions |
Sample File
ListView
|
|
1. What is a ListView ? 1.2 The ListView's purpose 1.3 ListView background 2. Create a ListView 2.1 Userform 2.1.1 Design Mode 2.1.2 Loaded Userform 2.1.3 Sample file 2.2 Worksheet 2.2.1 ListView clearing 2.2.2 ListView showing 2.2.3 ListView position 2.2.4 Sample file 2.3 RAM 3. Creating columnheaders 3.1 Real-time 3.2 Design Mode 3.3 VBA design 4. ListItems 4.1 Adding 4.2 ListSubItems: adding 4.3 Fill by Array 4.4 Fill by Listobject 4.5 ListView size 5. ListItem read and modify 5.1 ListItem read 5.2 ListItem modify 5.3 ListSubItem read 5.4 ListSubItem modify 5.5 ListSubItem direct access 5.6 ListSubItem modify directly 6 Delete elements 6.1 ListItem 6.2 All ListItems 6.3 ListSubItem 6.4 All ListSubItems 7. Icons in ListView 7.1 Columnheader 7.2 ListItem 7.2.1 Remove from ListItem 7.3 ListSubItem 7.3.1 Remove from ListSubItem 8. ListView Views 8.1 Icons 8.2 Small icons 8.3 List 8.4 Report 9. Sort 9.1 by date 9.2 by number 9.3 Interactive sort 9.4 Interactive by date 9.5 Interactive numerically 10 ListView: data storage |
A ListView in VBA is a collection object: you can store strings in it The Listbox exists of 'records' (rows) and 'fields' (columns). The file list in Explorer is such a ListView. 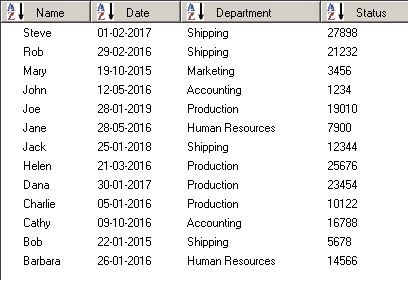
VBA has several other Objects to store data: - a dictionary - a collection - an array variable - an ActiveX ComboBox - an ActiveX ListBox - a ListBox in a Userform - a sortedlist The choice for an Object is dependent of the goal you want to accomplish. I will not compare all these Objects here. An introduction to the ListView is the primary goal. A ListView can be part of a userform, a worksheet as ActiveX-object or completely in the internal memory. You are very familiar with the ListView since it is the main window structure that Window Explorer uses to show folders, files and their properties. A ListView has 4 distinctive features. You can sort its items by every 'property'. The ListView can present data in 4 distinctive 'views'. You can add graphical elements to elements in the ListView. You can refer to every element in the ListView by its key. You can use the ListView to store data and to adapt them efficiently. By means of a ListView the data are available in the Random Access Memory. Since no calculations have to be performed, nor screens refreshed it's faster than an Excel Worksheet, Word document or Powerpoint Slide.
The ListView is part of the Windows controls library (Microsoft Windows Common Controls 6.0 (SP6)). This library isn't loaded by default. You can load this library in the VBEditor, tab 'Tools', option 'references'. You will find it in the alphabetical list of libraries. Mark the library to load it. In VBA you can load the library in 2 different ways: as GUID or as file. GUID ThisWorkbook.VBProject.References.AddFromGuid "{831FDD16-0C5C-11D2-A9FC-0000F8754DA1}", 0, 2 ThisWorkbook.VBProject.References.AddFromFile Replace(Environ("comspec"), "cmd.exe", "MSCOMCTL.OCX") - as userform control in a Userform
- as Active-X control in an Excel worksheet
- as virtual Object in Random Access Memory
A ListView in a Userform is always empty: it doesn't contain any data.In this respect the ListView is identical to a ComboBox or a ListBox in a Userform. Use the Design Mode to add the Listview to the Userform. All Listview properties you assign in Design Mode will be stored in the Userform's design. In Design Mode use the 'Toolbox' to add a ListView. If the Toolbox doesn't contain the Listview you can add it: - put the cursor in the Toolbox - right-click - click additional controls .. - select/check: Microsoft ListView Control, version 6.0 After you have added the ListView to the userform, you can set a large number of properties. This is useful if you know in advance which data you want to include in the ListView. In the property ColumnHeaders you can predefine the size (number of columns) of the ListView and possibly the column names. All properties can be set in advance.(it seems in Excel versions >14.0 it can't) Filling the ListView with data can only be done when the Userform is loaded.
Private Sub Userform_Initialize()
Controls.Add "MSComctlLib.ListViewCtrl.2", "snb"
End SubTo create and position the ListView simultaneously: Private Sub Userform_Initialize()
With Controls.Add("MSComctlLib.ListViewCtrl.2", "snb")
End Sub.Top = 70
End With.Left = 20 .Height = 90 .Width = 120 The Userform_Initialize event contains all code to show the Listview correctly. But it's preferable to set all properties in Design Mode. VBA-code exclusively can populate the ListView and add icons to elements. The sample file illustrates the use of icons in ColumnHeaders, ListItems and ListSubitems. It also contains code to switch between View options by clicking in the Userform. The event _ColumnClick sorts the columns ascendingly / descendingly. You can add a ListView as ActiveX-control to a worksheet. The first argument (Class Type) in the method 'Add' is "MSComctlLib.ListViewCtrl.2". All other arguments are optional. Sheet1.OLEObjects.Add "MSComctlLib.ListViewCtrl.2" To set the Listview's position and size: Sheet1.OLEObjects.Add("MSComctlLib.ListViewCtrl.2", , , , , , , columns(6).left, rows(1).top, 300, 300).name = "snb"
If you want to use the ListView you will have to rebuild it every time the workbook is loaded. The Listview's OLEobject-container however is being kept, the ListView-object itself isn't. In order to be able to create a new Listview the OLEobject-container has to be removed first. If the Listview's name isn't known beforehand: On Error Resume Next For Each it In Sheet1.OLEObjects x3 = TypeName(it.Object) = "ListView"
NextIf Err.Number <> 0 Then it.Delete Err.Clear Private Sub Workbook_Open()
On Error Resume Next
End SubSheet1.OLEObjects("LV_00").Delete
You need a trick to overcome this: the switch between worksheets and to scroll the worksheet, using PgUp and PgDn. You need 2 worksheets to do this. In VBA Sheet1.OLEObjects.Add("MSComctlLib.ListViewCtrl.2", , , , , , , columns(6).left, rows(1).top, 300, 300).name = "snb" Sheet2.Activate Sheet1.Activate ActiveWindow.LargeScroll 1 ActiveWindow.LargeScroll , 1 The OLEObject is part of the 'Shapes' collection in a sheet. A 'Shape' is automatically linked to a cell's position and size. That is not very practical for a ListView. Set the property .placement = 3 to use the Listview as an independent object in the sheet. With Sheet1.OLEObjects.Add("MSComctlLib.ListViewCtrl.2", , , , , , , columns(6).left, rows(1).top, 300, 300)
.Name = "snb"
End With.Placement=3 Sheet2.Activate Sheet1.Activate ActiveWindow.LargeScroll 1 ActiveWindow.LargeScroll , 1 All elements that are visible in the Userform will also be visible in the worksheet. The code in 'Workbook_open' also creates the sorting code of the _ColumnClick event in the sheet's macromodule. In this case you need to use the CLSID (ClassIdentification). To create a virtual ListView in memory use: With GetObject("New:{996BF5E0-8044-4650-ADEB-0B013914E99C}")
.....
End WithTo show 'Fields' you have to add columnheaders. Columnheader are independent of the amount of fields. - a ListView can contain more columnheaders than the number of fields in a record. - a ListView can contain fewer columnheaders than the number of fields in a record. You need columheaders in order: - to show the ListView's reportview - to sort the data in the ListView - to use the ListItem's property .Subitems Show/hide separate columns The object 'ColumnHeader' in the ListView has no property .Visible. You can show/hide a column using its property .Width. If the property .Width has value 0, the column isn't visible in reportview (.View = 3) Show/hide columnheaders You can show/hide columnheaders in reportview. The sorting in the Listview is independent of the showing/hiding of columnheaders. Show all columnheaders .HideColumnHeaders =False .HideColumnHeaders =True
- index; the order of the column from left to right - key; how to refer directly to the columnheader - caption: the visible text in the columnheader - width: the columnwidth in reportview (.View = 3). if you omit the width argument, VBA calculates the columnwidth itself, based on the Listview's width and the number of columns You only have to specify the widths if you want them different from the calculated ones. To set the width for columns 1,2,3 and 4 in ListView 'LV_00' to 60,30,90 and 60 respectively. With LV_00
for jj = 1 to 4
end with.ColumnHeaders.Add , "K_" & jj,"Kolom " & jj, choose(jj, 60, 30, 90, 60)
next.HideColumnHeaders = False
It looks as if this opportunity has been removed in versions > Office 2010 Click in the window 'Properties' the second option 'Custom'. Activate the tab 'Column Headers'.
Sub M_snb()
With ThisWorkbook.VBProject.VBComponents("Userform1").Designer
End SubFor jj = 1 To 4
End With.Controls("LV_00").ColumnHeaders.Add , "K_" & jj, "kolom " & jj, choose(jj, 60, 30, 90, 60)
NextPrivate Sub Userform_Initialize()
For jj = 1 To 4
End SubLV_00.ColumnHeaders(jj).Text = "Room " & jj
Next The 'records' in a Listview are called 'ListItems' in VBA. A ListView is a collection of ListItems. The 'fields' of the records are called 'ListSubItems' in VBA. Every record is a collection of ListSubItems. To add a record you use: .ListItems.Add The first ListItem has index number 1. The method 'ListItems.Add' has 5 arguments - the record's order position in the ListItem collection ( = index number)
Add several records:if you omit this argument, the index number is the number of items + 1 .
- the unique key for the record; optional- the text/caption of the record; optional - the linked icon; optional - the linked small icon; optional For the use of icons see 7. Icons in ListView. Private Sub Userform_Initialize()
For j = 1 To 4
End SubLV_00.ListItems.Add , "Sleutel_" & j , "Text " & j
Next If you do not use keys you can add as many identical ListItems as you wish. In that case the index number is the exclusive identifier. There is no method to check the existence of a Listitem's key (like .exists in a Dictionary). To add a field (ListSubitem) in a record (Listitem) use .ListSubItems.Add The first ListSubItem gets index number 1. The method 'ListSubItems.Add' has 5 arguments - the field's position by index number
if omitted the ListSubItem gets the last index number + 1
- a unique key- the field's text/content - a link to a ReportIcon in the reportview (.View = 3) For the use of icons see 7. Icons in ListView.
- a tooltip text, that is being shown when you hover over the fieldPrivate Sub Userform_Initialize()
With LV_00
End SubFor j = 1 To 4
End WithWith .ListItems.Add( , "Key_" & j , "Text " & j)
For jj=1 to 6
Next.ListSubItems.Add ,"Keys_" & jj),"Text " & jj, ,,"tooltiptext_" & jj
nextIf you do not use keys you can add as many identical ListSubItems as you wish. In that case the index number is the exclusive identifier. There is no method to check the existence of a ListSubItem's key (like .exists in a Dictionary). In a lot of cases you want to fill the ListView by worksheet data. If you take the first worksheet row as columnheaders: Private Sub Userform_Initialize()
sn = Sheet1.Cells(1).CurrentRegion
End SubWith LV_00 For jj = 1 To UBound(sn, 2)
End With.ColumnHeaders.Add , , sn(1, jj)
Next.HideColumnHeaders = False For j = 2 To UBound(sn) With .ListItems.Add(, , sn(j, 1))
NextFor jj = 2 To UBound(sn, 2)
End With.ListSubItems.Add , , sn(j, jj)
Next
Private Sub Userform_Initialize()
sp = Sheet1.ListObjects(1).HeaderRowRange
End Subsn = Sheet1.ListObjects(1).DataBodyRange With LV_00 For jj = 1 To UBound(sp, 2)
End With.ColumnHeaders.Add , , sp(1, jj)
Next.HideColumnHeaders = False For j = 2 To UBound(sn) With .ListItems.Add(, , sn(j, 1))
NextFor jj = 2 To UBound(sn, 2)
End With.ListSubItems.Add , , sn(j, jj)
NextYou can use the collection of ListItems. Msgbox LV_00.ListItems.count The number of SubListItems isn't suited as indicator for the number of 'fields'. The number of columnheaders indicates the maximum number of columns that can be shown in reportview. Msgbox LV_00.ColumnHeaders.Count Each ListItem has properties such as e.g.: - index number
You can read these properties per ListItem.- key - text - linked icon - linked small icon for each it in LV_00.ListItems
MsgBox join(array(it.Index,it.Key, it.Text,it.Icon,it.SmallIcon, vbLf)
next
- key
- text - linked icon - linked small icon With LV_00.ListItems("Rob")
it.Key = "New_Key"
End Withit.Text = "New text" it.Icon = "peer" it.SmallIcon = "appel"
- index number
You can read these properties per ListSubItem.- key - text - linked icon - tooltiptext for each it in LV_00.ListItems("Rob").ListSubItems
MsgBox join(array(it.Index,it.Key, it.Text,it.ReportIcon,it.ToolTipText, vbLf)
next
- key - text - linked icon - tooltiptext Code to adapt these properties: With LV_00.ListItems("Rob").ListSubItems(1)
.Key = "New_Fieldkey"
End With.Text = "New field text" .ReportIcon = "peer" .ToolTipText = "tooltip_3"
You can also assign a key to every ListSubItem. Use these 2 keys to read every single ListSubItem in the ListView. MsgBox LV_00.ListItems("Rob").ListSubItems("Department") In that case you can apply the property .SubItems or the collection .ListSubItems For j = 1 To LV_00.ListItems("Rob").ListSubItems.Count
msgbox LV_00.ListItems("Rob").ListSubItems(j)
Nextmsgbox LV_00.ListItems("Rob").SubItems(j) For each it in LV_00.ListItems("Rob").ListSubItems
msgbox it
Next
You can also assign a key to every ListSubItem. Use these 2 keys to adapt any single ListSubItem in the ListView. Change a ListSubItem by adapting its property .Text. LV_00.ListItems("Rob").ListSubItems("Department").Text = "Warehouse" In that case you can apply the property .SubItems or the collection .ListSubItems. For j = 1 To LV_00.ListItems("Rob").ListSubItems.Count
LV_00.ListItems("Rob").ListSubItems(j).Text = "new time"
NextFor each it in LV_00.ListItems("Rob").ListSubItems
it.Text = it.Text & " new"
NextThe argument 'index' indicates which ListItem should be deleted. The first ListItem has index number 1 - If the index number is known, you can enter it directly
- if the index number is unknown, retrieve it by the ListItem's key With LV_00.ListItems
.Remove 3
End With.Remove LV_00.ListItems("Rob").Index With LV_00.ListItems
.Clear
End WithThe first argument indicates by index number which ListSubItem should be deleted. The first ListSubItem has index number 1 - If the index number is known, you can enter it directly
- if the index number is unknown, retrieve it by the ListSubItem's key With LV_00. ListItems("Rob").ListSubItems
.Remove 3
End With.Remove LV_00.ListItems("Rob").ListSubItems("Department").Index With LV_00.ListItems("Rob")
.Clear
End With- the ColumnHeader - a ListItem - a ListSubItem These elements are being shown by its icon and/or text. Icon are not part of the ListView itself. Icons are being stored in separate 'ImageLists' in the Userform or the Worksheet. The ImageList is part of the same library that contains the ListView. Of course this is not applicable to a virtual (invisible) ListView. The ListView distinguishes between Icons, SmallIcons and ReportIcons. You need a separate Imagelist for Icons, SmallIcons and ReportIcons since each list can only contain 1 size of images. In order to make use of Icons every ListView element - ColumnHeader, ListItem or ListSubItem needs to be linked to an Imagelist. An Imagelist can be part of a Userform or of a worksheet; it doesn't matter where. Columnheaders are only visible in the ListView's reportview. The use of icons in ColumnHeaders makes only sense if - the reportview is active (.View = 3) - the columnheaders are visible ( .HideColumnHeaders = False ) To link icons to columnheaders, a link to an imagelist must be established by the .ColumHeaderIcons property. If the ListView name in the Userform is LV_00 and the ImageList name in the Userform IL_00: LV_00.ColumnHeaderIcons = IL_00 That is happening in the property .Icon of .ColumnHeader. Each columnheader can have its own, or no icon. Use the icon's name in the linked Imagelist. a new columnheader LV_00.ColumnHeaders.Add , "Key_1", "Text_1", 120, "apple" LV_00.ColumnHeaders("Key_").Icon ="apple" a new columnheader LV_00.ColumnHeaders.Add , "Key_1", "Tex_1", 120, 2 LV_00.ColumnHeaders("Key_1").Icon = 2 To show normal icons set the ListView property .View = 0. To show small icons: .View = 1. If you want to use normal and small icons you need 2 separate ImageLists, each containing icons of different sizes. You will have to link these InmageLists by 2 different ListView properties: .Icons and .SmallIcons Link 'normal' icons to ListItems. Assume the ListView LV_00 and the ImageList with 'normal' icons IL_00: LV_00.Icons = IL_00 Assume the ListView LV_00 and the ImageList with 'small' icons IL_01: LV_00.SmallIcons = IL_01 In the ListItems' property .Icon you link to a 'normal' icon. In the ListItem's property .SamllIcon you link to a small icon. The .property .Icon is independent of the property .SmallIcon. Every icon in an Imagelist has a unique index number and a unique key. The text in the .Icon property refers to the key in the linked Imagelist. The text in the .SmallIcon property refers to the key in the linked Imagelist. The icon's key in the Imagelist. A new ListItem LV_00.ListItems.Add , "key_1", "text_1", "apple", "apple_small" LV_00.ListItems("key_1").Icon ="apple" LV_00.ListItems("key_1").SmallIcon = "apple_small" Every icon in an Imagelist has a unique index number and a unique key. A number in the property .Icon refers to the icon's index number in the linked Imagelist. A number in the property .SmallIcon refers to the icon's index number in the linked Imagelist. A new ListItem LV_00.ListItems.Add, "sleutel 1", "text 1", 3, 7 LV_00.ListItems("key 1").Icon = 3 LV_00.ListItems("key 1").SmallIcon = 7
LV_00.ListItems("sleutel 1").Icon = Empty LV_00.ListItems("sleutel 1").SmallIcon = Empty LV_00.ListItems.Add , "key_1", "text_1", iif(LV_00.ListItems.Count mod 2 =0,"apple",Empty) LV_00.ListItems.Add , "key_1", "text_1", , iif(LV_00.ListItems.Count <5,"apple_small",Empty) Only the reportview (.View=3) of the Listview shows them. No distinction is made between Icons and SmallIcons. The ListSubItem uses the Imagelist linked in the Listview's .SmallIcons property. In this Imagelist you can determine the size of it's icons. Assume Listview (LV_00) and ImageList (IL_01): LV_00.SmallIcons = IL_01 A new ListSubItem: key LV_00.ListItems("Rob").ListSubItems.Add , "Key_1", "text_1", "apple", "tooltiptex_1" LV_00.ListItems("Rob").ListSubItems.ReportIcon = "apple" LV_00.ListItems("Rob").ListSubItems.Add , "key_1", "text_1", 3, "tooltiptext_1" LV_00.ListItems("Rob").ListSubItems.ReportIcon = 3
LV_00.ListItems("key_1").ListSubItems(1).ReportIcon = Empty In the .ReportIcon argument: LV_00.ListItems("Rob").ListSubItems.Add , "key_1", "text_1", IIf(LV_00.ListItems.Count>4, 3, Empty), "tooltiptext_1" The ListView has 4 views. The ListItems are visible in all views. Only in report-view all ListSubItems ('fields') and columnheaders are visible. The property .View controls how ListItems are being shown. This ListView.View property has the value lvwIcon or 0. The ListItems are being sorted from the left upper cell to the right bottom cell. The ListItems icons are visible dependent of: - the property ListView.Icons if the Listview is linked to an ImageList
The property .Icons makes a link to an ImageList.- and the property .ListItem(j).Icon of every single ListItem. This link is only relevant for this View option lvwIcon. In all other cases the Imagelist linked to the property .SmallIcons is decisive.
The ListItems are being sorted from the left upper cell to the right bottom cell. The ListItems small icons are visible dependent of: - the property ListView.SmallIcons to link the Listview to an ImageList
The ListView.View property has value lvwList or 2.
- and the property .ListItem(j).SmallIcon value (key or index number) of every single ListItem. ListItems are being sorted from top to bottom and from left to right in columns. Small icons are visible dependent of: - the property ListView.SmallIcons to link the Listview to an ImageList
The ListView.View property has value lvwReport or 3.
- and the property .ListItem(j).SmallIcon value (key or index number) of every single ListItem Information is being shown as a table. columnheaders - all texts can be visible - all icons can be visible ListItems - all texts can be visible - all icons can be visible ListSubItems - all texts can be visible. - all icons can be visible Which elements are visible is dependent of Column - the column property .Width is greater than 0 Columnheader - the property ListView.HideColumnHeaders is False Columnheader Icon - the property ListView.ColumnHeaderIcons is linked to an ImageList - the property columnheader(n).Icon contains an index number or Key referring to the linked Imagelist ListItem text - the corresponding ColumnHeader is visible ListItem icon: - the corresponding ColumnHeader is visible - the property ListView.SmallIcons is linked to a valid Imagelist - the property ListItems(j).SmallIcon contains a valid key or valid index number ListSubItem Text: - the corresponding ColumnHeader is visible ListSubItem icon: - the corresponding ColumnHeader is visible - the property ListView.SmallIcons is linked to a valid Imagelist - the property ListSubItems(j).ReprotIcon contains a valid key or valid index number The ListView has it's own sorting method. A ListView is always sorted by ListItem ('record') The sorting uses the columnheaders indices. Sorting without columnheaders isn't possible Sorting is dependent of - ListView.Sorted property: value 0 (not sorted) or 1 (sorted). - ListView.SortKey the sorting column by it's index number. The fist column in the ListView has index number 0.
- ListView.SortOrder sorting ascendingly: 0 or descendingly: 1.All 'fields' in a ListView are string values. Sorting is based on the property .Text of ListItems and ListSubItems. So sorting is always alphanumeric. For sorting of numbers and dates: see 9.1. ListView sorting by ListItem With LV_00
For jj = 1 To 4
End With.ColumnHeaders.Add , "Key " & jj, "Text " & jj, 80
Next' . . . add data .Sorted = 1 .SortKey = 0 .SortOrder = 0 .SortOrder = lvwascending .SortOrder = 1 .Sortorder = lvwdescending With LV_00
For jj = 1 To 4
End With.ColumnHeaders.Add , "Key " & jj, "Text " & jj, 80
Next' . . . add new data .Sorted = 1 .SortKey = 3 .SortOrder = 1 If you use the ISO-format yyyy/mm/dd (the 'small-endian' format) you can sort every date correctly. The sorting of a string is from left to right. In VBA dates are numbers. The number 1 is equal to 01-01-1900. You can only perform an alphanumeric sort on numbers if all numbers have the same amount of digits. An alphanumeric sort on numbers results in 61 greater than 567. All dates between 18-05-1927 (10000) and 13-10-2137 (99999) contain 5 digits; alphanumerical sorting results in an identical order to numerical sorting. If you want to show dates in the reportview in the format dd-mm-yyyy, you need an extra column for the sorting. That column can be made invisible in the reportview. So the sorting will take place in the hidden sorting column, the dates will be shown in the 'normal' column. Sort by format The ListView has 3 visible columns and 2 invisible columns. The first column contains the ListItem with a string. The second column is invisible and contains the ISO-formatted (yyyymmdd) date in column 4: a sorting column. The third column is invisible: a sorting column for numbers. The fourth visible column consists of normally formatted dates: dd-mm-yyyy. The fifth column has some text e.g. the name of a department. Data are being - sorted, since .Sorted = 1 - sorted ascendingly, since .SortOrder = 0 - sorted by column 2, since .SortKey = 2 Private Sub UserForm_Initialize()
sn = Split("name datesort numbersort date department")
End SubWith LV_00 for jj = 0 to 4
End With.ColumnHeaders.Add , sn(jj), sn(jj), iif(jj<2, 0, 60)
NextFor j = 0 To 4 With .ListItems.Add(, , "Name " & j)
NextFor jj = 1 To 3
End With.ListSubItems.Add , , Choose(jj, Format(Date - j, "yyyymmdd"),"",Date - j, sn(jj) & " " & j,) Next.Sorted = 1 .SortKey = 2 .SortOrder = 0 .View = 3 The ListView has 3 visible columns and 2 invisible columns. The first column contains the ListItem with a string. The second column is invisible and contains the number-formatted (CLng(Date j)) date in column 4: a sorting column. The third column is invisible and empty: a sorting column for numbers. The fourth visible column consists of normally formatted dates: dd-mm-yyyy. The fifth column has some text e.g. the name of a department. Data are being - sorted, since .Sorted = 1 - sorted ascendingly, since .SortOrder = 0 - sorted by column 2, since .SortKey = 2 Private Sub UserForm_Initialize()
sn = Split("name sortdate sortnumber date department")
End SubWith LV_00 For jj = 0 To 4
End With.ColumnHeaders.Add , sn(jj), sn(jj), iif(jj<2, 0, 60)
NextFor j = 0 To 4 With .ListItems.Add(, , "Name " & j)
NextFor jj = 1 To 4
End With.ListSubItems.Add , , Choose(jj, CLng(Date - j),"",Date - j, sn(jj) & " " & j)
Next.Sorted = 1 .SortKey = 2 .SortOrder = 0 .View = 3 It considers 61 to be greater than 287. Only same sized (amount of digits) numbers will be identically sorted by numerical and alphanumerical sorting methods. We can use 'format' to make numbers identical in amount of digits. Format(61,"000") creates "061" and format(287,"000") "287". Now alphanumerical sorting considers "287" to be greater than "061". If you want to show numbers as number in the reportview, you will need an extra alphanumerical sorting 'column'. You might prefer to hide this sorting column by making it invisible in de reportview. The sorting column will be sorted, the number column will be shown. Sort by format The ListView has 3 visible columns and 2 invisible columns. The first column contains the ListItem with a string. The second column is invisible and empty. The third column is invisible and contains the number in column5 in the format("000000"). The fourth visible column consists of normally formatted dates: dd-mm-yyyy. The fifth column is the number of a department. Data are being - sorted, since .Sorted = 1 - sorted descendingly, since .SortOrder = 1 - sorted by column 2, since .SortKey = 3 Private Sub UserForm_Initialize()
sn = Split("name sortdate sortnumber date department number")
End SubWith LV_00 For jj = 0 To 5
End With.ColumnHeaders.Add , sn(jj), sn(jj), iif(jj<2,0,60)
NextFor j = 0 To 4 With .ListItems.Add(, , "Name " & j)
NextFor jj = 1 To 4
End With.ListSubItems.Add , , Choose(jj, "", Format(12^j, string(15,"0")),format(Date +j,"dd-mm-yyyy"), 12^j)
Next.Sorted = 1 .SortKey = 2 .SortOrder = 1 .View = 3 The ListView provides this too. The ListView has a _ColumnClick event Private Sub ListView_ColumnClick(ByVal ColumnHeader As MSComctlLib.ColumnHeader) Every columnheader has the property .SubItemIndex. This property .SubItemIndex represents the link between the columnheader and a ListSubItem. If you want to use the columnheader button to toggle between sorting ascendingly/descendingly: Private Sub LV_00_ColumnClick(ByVal ColomnHeader As MSComctlLib.ColumnHeader)
With LV_00
End Sub.SortKey = ColomnHeader.SubItemIndex
End With.SortOrder = Abs(.SortOrder = 0)
Let's use the first ListView column as date sorting column. Let's use the second ListViewcolumn as number sorting column. If no date or number sorting is necessary we keep those as empty columns. That's no imepdiment to the properly functioning of the ListView. If several date columns or number column have to be sorted you need a sorting column for each of those. In the eventprocedure ListView_ColumnClick the property .Sortkey gets the value of the column that has to be sorted. That value is the property .SubItemIndex corresponding to each columnheader. For sorting by date the clicked column isn't the sorting column. We can use the columnheader's property .Tag to link the column to the sorting column. The dates will be part of a ListSubItem. On top of that that they will have to be stored in a sortable format in the ListSubItem of the corresponding sorting column. For dates the format can be either format(date,"yyyymmdd") or Clng(date). Private Sub UserForm_Initialize()
sn = Sheet1.Cells(1).CurrentRegion
End SubWith LV_00 For jj = 1 To UBound(sn, 2)
end with.ColumnHeaders.Add(, sn(1, jj), sn(1, jj), Choose(jj, 60, 60, 120, 60)).Tag = IIf(IsDate(sn(2, jj)), 1, IIf(IsNumeric(sn(2, jj)), 2, ""))
NextIf jj = 1 Then .ColumnHeaders.Add , "date_", , 0
End If.ColumnHeaders.Add , "number_", , 0 .HideColumnHeaders = False For j = 2 To UBound(sn) With .ListItems.Add(, sn(j, 1), sn(j, 1))
Next.ListSubItems.Add , LV_00.ColumnHeaders(2).Key
.ListSubItems.Add , LV_00.ColumnHeaders(3).Key
End WithFor jj = 2 To UBound(sn, 2) .ListSubItems.Add , sn(1, jj), sn(j, jj), , "tooltiptexst" & jj
NextIf IsDate(sn(j, jj)) Then .ListSubItems(1).Text = CLng(sn(j, jj)) If IsNumeric(sn(j, jj)) Then .ListSubItems(2).Text = Format(sn(j, jj), String(15, "0")) .Sorted = 1 .View = 3 Private Sub LV_00_ColumnClick(ByVal ColomnHeader As MSComctlLib.ColumnHeader)
With LV_00
End Sub.SortKey = IIf(ColomnHeader.Tag = "", ColomnHeader.SubItemIndex, ColomnHeader.Tag)
End With.SortOrder = Abs(.SortOrder = 0)
Let's use the first ListView column as date sorting column. Let's use the second ListView column as number sorting column. If no date or number sorting is necessary we keep these columns empty. That's no impediment to the properly functioning of the ListView. If several date columns or number columns have to be sorted you need a sorting column for each of those. In the eventprocedure ListView_ColumnClick the property .Sortkey gets the value of the column that has to be sorted. That value is the property .SubItemIndex corresponding to each columnheader. But to sort numbers the clicked column isn't the sorting column. We can use the columnheader's property .Tag to link the column to the sorting column. The numbers will be part of a ListSubItem. On top of that they will have to be stored in a sortable alphanumerical format in the ListSubItem of the corresponding sorting column. For number values the format can be format(number,string(15,"0")). Private Sub UserForm_Initialize()
sn = Sheet1.Cells(1).CurrentRegion
End SubWith LV_00 For jj = 1 To UBound(sn, 2)
end with.ColumnHeaders.Add(, sn(1, jj), sn(1, jj), Choose(jj, 60, 60, 120, 60)).Tag = IIf(IsDate(sn(2, jj)), 1, IIf(IsNumeric(sn(2, jj)), 2, ""))
NextIf jj = 1 Then .ColumnHeaders.Add , "date_", , 0
End If.ColumnHeaders.Add , "number_", , 0 .HideColumnHeaders = False For j = 2 To UBound(sn) With .ListItems.Add(, sn(j, 1), sn(j, 1))
Next.ListSubItems.Add , LV_00.ColumnHeaders(2).Key
.ListSubItems.Add , LV_00.ColumnHeaders(3).Key
End WithFor jj = 2 To UBound(sn, 2) .ListSubItems.Add , sn(1, jj), sn(j, jj)
NextIf IsDate(sn(j, jj)) Then .ListSubItems(1).Text = CLng(sn(j, jj)) If IsNumeric(sn(j, jj)) Then .ListSubItems(2).Text = Format(sn(j, jj), String(15, "0")) .Sorted = 1 .View = 3 Private Sub LV_00_ColumnClick(ByVal ColomnHeader As MSComctlLib.ColumnHeader)
With LV_00
End Sub.SortKey = IIf(ColomnHeader.Tag = "", ColomnHeader.SubItemIndex, ColomnHeader.Tag)
End With.SortOrder = Abs(.SortOrder = 0) It is also possible to use VBA to adapt a ListView. To save the result in a Listview you will have to read them in an array or string. You can save the array in an Excel worksheet. The string can be saved in Word, or as .txt or .csv file. Array & Excel With LV_00
ReDim sp(.ListItems.Count, .ColumnHeaders.Count)
End WithFor jj = 0 To .ColumnHeaders.Count - 1 sp(0, jj) = .ColumnHeaders(jj + 1).Text
NextFor j = 1 To UBound(sp) sp(j, 0) = .ListItems(j)
NextFor jj = 0 To UBound(sp, 2) - 1 sp(j, jj + 1) = .ListItems(j).ListSubItems(jj + 1)
NextSheet2.Cells(1).Resize(UBound(sp), UBound(sp, 2) + 1) = sp If the first 2 ListSubItem-columns are sorting columns: With LV_00
For jj = 1 To .ColumnHeaders.Count
End WithIf .ColumnHeaders(jj).Text <> "" Then c00 = c00 & "," & .ColumnHeaders(jj).Text
NextFor j = 1 To .ListItems.Count c00 = c00 & vbCrLf & .ListItems(j)
NextFor jj = 3 To .ListItems(j).ListSubItems.Count c00 = c00 & "," & .ListItems(j).ListSubItems(jj)
NextMsgBox Mid(c00, 2) CreateObject("scripting.filesytemobject").createtextfile("G:\OF\ListView.csv").write c00 |